Tag: python

Motorized LEGO® train switch with Mindstorms

An example of motorizing a LEGO® train switch (turnout), and controlling it from Mindstorms

A goal of mine is to – someday – create a more or less automated running LEGO® railroad layout. One of the steps towards that is to operate the switches by motors, and then control the motors by programming on the EV3.

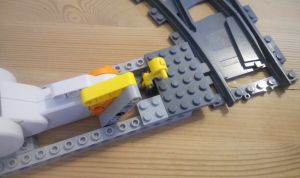
Inspired by a video (which I can’t find again and credit properly), I simplified, and made the shown design.

Two 16 long studded technic bricks keeps the motor in place, and is attached to the switch with normal bricks. This can be done in many ways, and probably also more compact and sturdier than this design.

A 5 long liftarm is attached to the motor, and 2 x thin 4 long liftarms are connecting to the switch. The thin liftarms has an axle hole at the ends, which can hold the tap of the lever.

This was the easy part. The programming is also not difficult – it is basically just turning a motor a certain number of degrees. The tuning of the degrees needed as well as the speed takes some time, but I found an angle of 43 and speed of 50 works well. See my code at the end of this post.

Functional motorized LEGO® train switch, operated by Mindstorms EV3.

Videos of other builds using Mindstorms to control the switches:

My code example used in the video:

#!/usr/bin/env python3
from ev3dev.ev3 import *
from time import *

# Connect motors and sensors
ts = TouchSensor("in1")
lm = LargeMotor("outA")

# Variables for tuning the switch.
# Make sure that the polarity of the motor is right.
# Test it before attaching the motor to the switch.
degrees = -43
speed = 50

# Make sure that the switch is manually put to "straight" position
# before running the program. Below resets the angle counter
# of the motor to zero.
lm.position = 0

def main():
    # direction of the switch: 0 = straight, 1 = turn/diverting
    switch_state = 0
    while True: # Loop forever - press back button on EV3 to stop.
        if ts.value() >= 1:   # If touchsensor pressed.
            if switch_state == 0:
                lm.run_to_abs_pos(position_sp=degrees, speed_sp=speed, stop_action="brake")
                Sound.speak("Turn")
                sleep(3)
                switch_state = 1
            elif switch_state == 1:
                lm.run_to_abs_pos(position_sp=0, speed_sp=speed, stop_action="brake")
                Sound.speak("Straight")
                sleep(3)
                switch_state = 0

if __name__ == '__main__':
    main()

More sensors – Mindsensors.com Sensor Multiplexer

The EV3 has 4 sensor ports. To increase number of ports, a sensor multiplexer might be the answer. This post explains the use of Mindsensors.com EV3SensorMux

EV3SensorMUX-front-resized

As soon as you want to create more sophisticated, multi-functional robots, you run into the sensor limit. The sensors are what makes your robot aware of the world surrounding it, and the more the robot can sense, the more precise it can act.

The Mindsensors.com EV3SensorMUX provides the possibility to connect up to 3 sensors to 1 sensor port. The result is an increase to a total of 6 sensors ports (from 4 + additional 3, less the one used for the EV3SensorMUX.

There are four pin holes, compatible with the standard LEGO® connection pins, for attachment. 5 studs wide and 6 studs longs.

The EV3SensorMUX only supports original LEGO® EV3 sensors – you won’t be able to use NXT or 3rd party sensors.

Using the EV3SensorMUX with EV3dev Python

If you are using the EV3-G visual programming environment from LEGO®, then there are designated, downloadable blocks available. However, if you want to use it with EV3dev Python, then there are a few more exercises to be done.

The code below first sets up 3 LegoPort objects, assigned the input ports of the EV3SensorMUX. The first in2 is the EV3 sensor port that the EV3SensorMUX is attached to – and the normal way to designate a EV3 sensor port. After the : the i2c communication protocol is specified, and the 80, 81 and 82 is are the ic2 port addresses on the EV3SensorMUX,  and the mux1, mux2, and mux3 are the actual ports, to which you can assign a sensor.The documentation on Mindsensors.com webpage, as well as the EV3dev docs, shows 50, 51 and 52 as the ic2 addresses, but for me it is not – or I simply didn’t understand it…

When plugging in the EV3SensorMUX you can find the full port addresses in the folder /sys/bus/lego/devices/ as in the screenshot. I am using MobaXterm for SSH terminal, as it has a good file browser). We can also see the driver for LEGO® EV3 color sensor is loaded by default. In the code (at the bottom of this post), we therefore have to set the right devices for each port.

Furthermore, the TouchSensor is an analog sensor, and we therefore have to set the mode of this port to analog. For the other ports, we don’t have to set the mode (only the sensor type), since the other sensors are the same type as the EV3 color sensor which was loaded by default. For an overview of the different sensor communication types, see here.

Also note, that because of latency (I believe due to file I/O), we will have to include a sleep command after each initialization, in order to have the right drivers etc. loaded. My experience is that if you are running the programs directly from a SSH terminal or on the EV3 itself, 500 ms is enough. Running the programs from Visual Studio Code requires 1000 ms (1 second).

Finally, using sound.speak to tell us when the sensor threshold value is reached/activated. Have a look at the result in this video:

mindsensors.com EV3SensorMUX in action…

You can also enjoy another implementation for a “Laser Harp” at this great site: https://ofalcao.pt/blog/series/lego-laser-harp

Code for example:

#!/usr/bin/env python3
# imports
from ev3dev.ev3 import *
from time import sleep, time
import sys

# -------------------------------
# CONNECTING SENSORS
# -------------------------------

# setting LegoPort interface
muxC1port = LegoPort("in2:i2c80:mux1")
muxC2port = LegoPort("in2:i2c81:mux2")    # (driver_name="ms-ev3-smux")
muxC3port = LegoPort("in2:i2c82:mux3")

# setting the 1st port on SensorMUX to analogue mode, to be used for touchsensor
muxC1port.mode = "analog"
sleep(1) # need to wait for analog mode to be set

# loading the devices for each port
muxC1port.set_device="lego-ev3-touch"
muxC2port.set_device="lego-ev3-us"
muxC3port.set_device="lego-ev3-ir"

ts = TouchSensor("in2:i2c80:mux1")
us = UltrasonicSensor("in2:i2c81:mux2")
ir = InfraredSensor("in2:i2c82:mux3")
sleep(1) # need to wait for sensors to be loaded. 0.5 seconds is not enough.

us.mode = "US-DIST-CM" # setting to measure distance in centimeters
ir.mode = "IR-PROX" # setting to measure proximity.

def debug_print(*args, **kwargs):
    # Print debug messages to stderr. This shows up in the output panel in VS Code.
    print(*args, **kwargs, file=sys.stderr)

def main():
    # writing initial sensor values
    debug_print("TS: " + str(ts.value()) + " IR: " + str(ir.value()) + " US: " + str(us.value()))
    while True:
        if ts.value() == 257: # 256 == not pressed, 257 == pressed
            Sound.speak("Touch sensor")
        if ir.value() <= 10:
            Sound.speak("Infrared sensor")
        if us.value() <= 50:
            Sound.speak("Ultrasonic sensor")

if __name__ == '__main__':
    main()