Tag: automation

Automatic LEGO® train decoupling solutions

Post reviewing the different types of automatic decoupling solutions

In order to have an automatic, “no-touch” railroad layout, an automatic decoupler is high on my wish list. I visualize a shunting yard with a ladder, where I can rearrange the consist of freight trains, and have a somewhat prototypical operation.

There are in short 4 types of decouplers that I am aware of:

1 – Decoupler under/between the rails

A beam stretches upwards and catches the undercarriage of the wagon. These solutions rely on the inertia/speed or at least the wheel grip of the locomotive, to overcome the pulling force of the magnets.

  • Pro: The solution can be made very small and compact
  • Con: It will always decouple by the weakest magnet link – so it is mainly useful four decoupling a single wagon or a complete set of i.e. passenger cars.

The solutions can be:

  • Passive: Always decouple when running the train forward over the decoupler. No motorization required!
  • Active: The beam can be raised/lowered, allowing for running on the track in both directions, and actively manage the decoupling.

Examples:

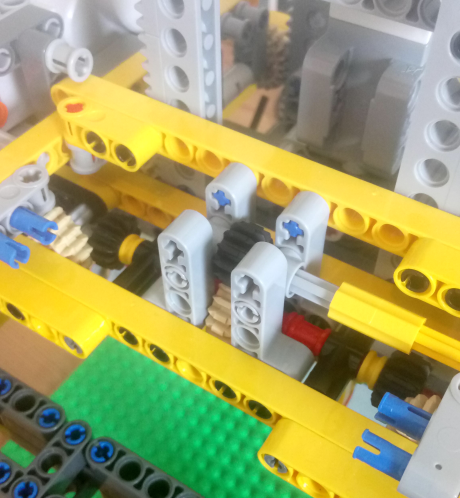
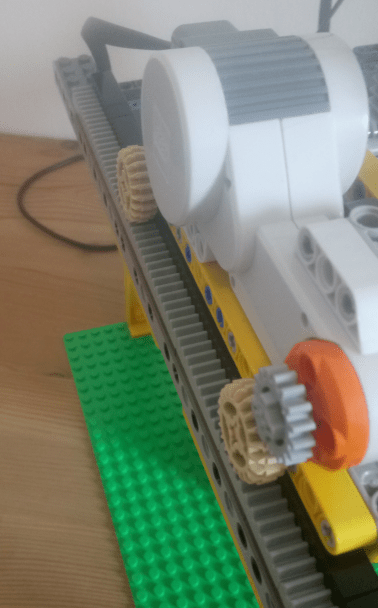
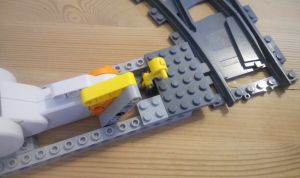
2 – Sidebeams + pushing wagons/magnets from each other

This solution drives a beam in between the wagons you want to decouple, and actively pushes them away from each other, to overcome the magnetic pulling force.

  • Pro: You can decouple anywhere in a trains consist, making it very flexible and more prototypical.
  • Con: Depending on the motors, the build can take up quite some space. The stopping location of the train must be very precise.

As in the first video in examples below, it might be possible to use only one motor to separate the magnets. The video features trains with the old style open magnetic couplers. I will try to check whether it also works with the new style magnets, or if I have to stick with a design, where I am actively pushing the wagons apart. More about that in upcoming post.

Examples:

3 – Blocking wheels of wagons / 4Dbrix

Another way of decoupling is to “lock” the wheels of the wagon, and drive the locomotive away, thereby decoupling. Intuitively, this would give the same problems as with solution 1: The wagons will decouple at the weakest link in the consist. The 3rd party manufacturer, 4Dbrix, however claims that this is not the case.

  • Pro: The smallest footprint on the reviewed solutions.
  • Con: May decouple only at the weakest link of the consist. It is NOT easily operable with Mindstorms, but instead operated by the free nControl PC software by 4Dbrix.

Link to product: https://www.4dbrix.com/products/train/2-04-017-decoupler/

4 – Original LEGO® 12v decoupler

LEGO® made a decoupler for the 12v train era back in the 1980s. It is difficult to get your hands on, and from what I can see from forums etc., it is not 100% reliable.

An idea for the future could be to build a similar solution, where the twisting mechanism is raised up between the tracks.

See a review here https://www.youtube.com/watch?v=EAeQRgs6qCU

Automatic LEGO® Container Yard – Post 2: Lifting and moving

Prototype on lifting and moving containers in a container yard

After building the container grabbing mechanism, time has come to move the container around:

The video is shown in double speed.

The lifting mechanism is designed using rack and pinion gears, distributed in four corners, to increase stability. The grabbing mechanism has the rack mounted, and the pinions are mounted on the overhead crane, enclosing the grabbing mechanism, to make it more stable.

Rack enclosed by gears/pinions in four corners. The crossbeams on top of racks are forcing the racks towards the gears.

The reason for having the pinions on the overhead crane, and not on the grabbing mechanism, is simply to make the grabbing mechanism lighter by not having another motor mounted on it.

Another design consideration is to have the same number of gear interfaces from the motor to both sides of the pinion/racks. At my first iteration, the motor was driving one side of the pinions directly, while the motion was directed to the pinions on the other side by gears and shafts. However, since there is some slack in the gears, it introduced a delay in the reaction of pinions on the other side, and the grabbing mechanism was lifted unevenly and wobbly. In the final prototype the motion is first directed to the center, and then directed to the two sides. There is still a slack and delay, but is evenly across the two sides.

Details of the centered motion distribution from motor to gears/pinions

The overhead crane has the weight of the motors evenly split on the two sides, moving as much weight as possible away from the center and reducing the need for reinforcement of the crossbeams.

Simple movement of the overhead crane

The movement in X-direction/crosswise is very simple. A motor, gear and racks in one side, and wheels on the other side, running on a smooth surface. The wheel side has a slight delay in reaction, as it is being “dragged” by the gear/rack side.

To solve this, there would have to be gear/rack on both sides, and the equivalent number (and ratio) of gears between the motor and racks on both sides – same principle as with the grabbing mechanism described above. For now, I decided that the lag on the wheel side is manageable, but I might correct it later, if the crane turns out to be too imprecise.

I experimented with several truss designs for the beams on which the overhead crane is resting on, but I ended up with using the 5×7 liftarms w/ open center, supported by a few other liftarms. This is lighter, but still sturdy.

The next steps will be to create the basis for moving the overhead crane in the X-direction/lengthwise, and introduce some kind of optical recognition/barcode for the containers, so the system can store the information on which containers are stored where.

Motorized LEGO® train switch with Mindstorms

An example of motorizing a LEGO® train switch (turnout), and controlling it from Mindstorms

A goal of mine is to – someday – create a more or less automated running LEGO® railroad layout. One of the steps towards that is to operate the switches by motors, and then control the motors by programming on the EV3.

Inspired by a video (which I can’t find again and credit properly), I simplified, and made the shown design.

Two 16 long studded technic bricks keeps the motor in place, and is attached to the switch with normal bricks. This can be done in many ways, and probably also more compact and sturdier than this design.

A 5 long liftarm is attached to the motor, and 2 x thin 4 long liftarms are connecting to the switch. The thin liftarms has an axle hole at the ends, which can hold the tap of the lever.

This was the easy part. The programming is also not difficult – it is basically just turning a motor a certain number of degrees. The tuning of the degrees needed as well as the speed takes some time, but I found an angle of 43 and speed of 50 works well. See my code at the end of this post.

Functional motorized LEGO® train switch, operated by Mindstorms EV3.

Videos of other builds using Mindstorms to control the switches:

My code example used in the video:

#!/usr/bin/env python3
from ev3dev.ev3 import *
from time import *

# Connect motors and sensors
ts = TouchSensor("in1")
lm = LargeMotor("outA")

# Variables for tuning the switch.
# Make sure that the polarity of the motor is right.
# Test it before attaching the motor to the switch.
degrees = -43
speed = 50

# Make sure that the switch is manually put to "straight" position
# before running the program. Below resets the angle counter
# of the motor to zero.
lm.position = 0

def main():
    # direction of the switch: 0 = straight, 1 = turn/diverting
    switch_state = 0
    while True: # Loop forever - press back button on EV3 to stop.
        if ts.value() >= 1:   # If touchsensor pressed.
            if switch_state == 0:
                lm.run_to_abs_pos(position_sp=degrees, speed_sp=speed, stop_action="brake")
                Sound.speak("Turn")
                sleep(3)
                switch_state = 1
            elif switch_state == 1:
                lm.run_to_abs_pos(position_sp=0, speed_sp=speed, stop_action="brake")
                Sound.speak("Straight")
                sleep(3)
                switch_state = 0

if __name__ == '__main__':
    main()