The EV3 has 4 sensor ports. To increase number of ports, a sensor multiplexer might be the answer. This post explains the use of Mindsensors.com EV3SensorMux
As soon as you want to create more sophisticated, multi-functional robots, you run into the sensor limit. The sensors are what makes your robot aware of the world surrounding it, and the more the robot can sense, the more precise it can act.
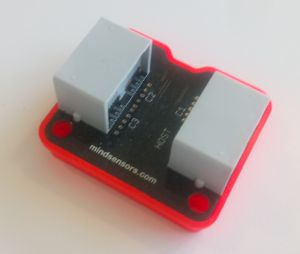
The Mindsensors.com EV3SensorMUX provides the possibility to connect up to 3 sensors to 1 sensor port. The result is an increase to a total of 6 sensors ports (from 4 + additional 3, less the one used for the EV3SensorMUX.
There are four pin holes, compatible with the standard LEGO® connection pins, for attachment. 5 studs wide and 6 studs longs.
The EV3SensorMUX only supports original LEGO® EV3 sensors – you won’t be able to use NXT or 3rd party sensors.
Using the EV3SensorMUX with EV3dev Python
If you are using the EV3-G visual programming environment from LEGO®, then there are designated, downloadable blocks available. However, if you want to use it with EV3dev Python, then there are a few more exercises to be done.
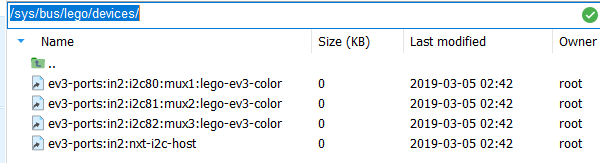
The code below first sets up 3 LegoPort objects, assigned the input ports of the EV3SensorMUX. The first in2 is the EV3 sensor port that the EV3SensorMUX is attached to – and the normal way to designate a EV3 sensor port. After the : the i2c communication protocol is specified, and the 80, 81 and 82 is are the ic2 port addresses on the EV3SensorMUX, and the mux1, mux2, and mux3 are the actual ports, to which you can assign a sensor.The documentation on Mindsensors.com webpage, as well as the EV3dev docs, shows 50, 51 and 52 as the ic2 addresses, but for me it is not – or I simply didn’t understand it…
When plugging in the EV3SensorMUX you can find the full port addresses in the folder /sys/bus/lego/devices/ as in the screenshot. I am using MobaXterm for SSH terminal, as it has a good file browser). We can also see the driver for LEGO® EV3 color sensor is loaded by default. In the code (at the bottom of this post), we therefore have to set the right devices for each port.
Furthermore, the TouchSensor is an analog sensor, and we therefore have to set the mode of this port to analog. For the other ports, we don’t have to set the mode (only the sensor type), since the other sensors are the same type as the EV3 color sensor which was loaded by default. For an overview of the different sensor communication types, see here.
Also note, that because of latency (I believe due to file I/O), we will have to include a sleep command after each initialization, in order to have the right drivers etc. loaded. My experience is that if you are running the programs directly from a SSH terminal or on the EV3 itself, 500 ms is enough. Running the programs from Visual Studio Code requires 1000 ms (1 second).
Finally, using sound.speak to tell us when the sensor threshold value is reached/activated. Have a look at the result in this video:
You can also enjoy another implementation for a “Laser Harp” at this great site: https://ofalcao.pt/blog/series/lego-laser-harp
Code for example:
#!/usr/bin/env python3
# imports
from ev3dev.ev3 import *
from time import sleep, time
import sys

# -------------------------------
# CONNECTING SENSORS
# -------------------------------

# setting LegoPort interface
muxC1port = LegoPort("in2:i2c80:mux1")
muxC2port = LegoPort("in2:i2c81:mux2")    # (driver_name="ms-ev3-smux")
muxC3port = LegoPort("in2:i2c82:mux3")

# setting the 1st port on SensorMUX to analogue mode, to be used for touchsensor
muxC1port.mode = "analog"
sleep(1) # need to wait for analog mode to be set

# loading the devices for each port
muxC1port.set_device="lego-ev3-touch"
muxC2port.set_device="lego-ev3-us"
muxC3port.set_device="lego-ev3-ir"

ts = TouchSensor("in2:i2c80:mux1")
us = UltrasonicSensor("in2:i2c81:mux2")
ir = InfraredSensor("in2:i2c82:mux3")
sleep(1) # need to wait for sensors to be loaded. 0.5 seconds is not enough.

us.mode = "US-DIST-CM" # setting to measure distance in centimeters
ir.mode = "IR-PROX" # setting to measure proximity.

def debug_print(*args, **kwargs):
    # Print debug messages to stderr. This shows up in the output panel in VS Code.
    print(*args, **kwargs, file=sys.stderr)

def main():
    # writing initial sensor values
    debug_print("TS: " + str(ts.value()) + " IR: " + str(ir.value()) + " US: " + str(us.value()))
    while True:
        if ts.value() == 257: # 256 == not pressed, 257 == pressed
            Sound.speak("Touch sensor")
        if ir.value() <= 10:
            Sound.speak("Infrared sensor")
        if us.value() <= 50:
            Sound.speak("Ultrasonic sensor")

if __name__ == '__main__':
    main()
